Tutorial: How to Create a Quiz with jQuery
What is jQuery?
jQuery is a JavaScript library. It is designed to be a lighter-weight than plain JavaScript so it is easier to write less, write faster, and do more in less time. It applies common tasks of JavaScript to lighter weight methods that can be called with much smaller and simplified lines of code.
Steps of this tutorial:
Basics of HTML and CSS:
- HTML Basics: How to Build the Structure of an HTML Page
- HTML Basics: How to Customize Your HTML for This Quiz
- HTML Basics: HTML Tags, Attributes & Terms
- CSS Basics: Applying a Custom Style Change with CSS
jQuery Features in this Tutorial:
HTML Basics: How to Build the Structure of an HTML Page
If you don't already have an html page to add your jQuery quiz to and this is your first time building a web page, here is run-down of the bare basics of an html page document structure and how to build an html page.
This is what an html comment tag looks like. It is used to place a comment into your html code for the purpose of leaving a note in your code for any developer (including yourself) who will read your code. It doesn't execute any function in the code. They are useful for leaving descriptions and notes.
<!-- This is an example of an html comment. -->This is the basic structure of an html file:
<!doctype html>
<html lang="en"> <!-- Sets the language of the page to English. Other language codes can be used if needed. -->
<head>
<meta charset="UTF-8"> <!-- Specifies character encoding of the html document uses the Latin alphabet. -->
<title>Your Web Page Title</title>
<!--The page title will be displayed in the browser tab and also effects SEO (Search Engine Optimization).-->
<link rel="stylesheet" type="text/css" href="index.css">
<!-- This line above here ^ is a link to an external css page used to apply css styles to your html page. -->
</head>
<body>
<!-- The content of your web page goes here between the opening and closing body tags. -->
</body>
<!-- This is where I usually put JavaScript or jQuery code inside <script> </script> tags.-->
</html>
Step 1: Inserting or Linking the jQuery Library to Your HTML File
This is an external javascript link to the jQuery library. It is required to have this link in your file for your jQuery code to work. It should be placed at the bottom of the html document before the closing html tag. Your jQuery script or link to external .js file containing your jQuery script should come after the script src link to the jQuery library so the jQuery library will load before your jQuery script. This is the minified link to version 2 of the jQuery libarary:
<script src="https://code.jquery.com/jquery-2.2.4.min.js"></script>It would also be placed near the bottom section of your html file before the closing html tag to link it to your external javascript file. An external javascript file allows you to keep all your JavaScript for the page it is linked to in an external JavaScript file. It works a lot like keeping CSS in an external file and linking your page to the external CSS instead of placing it all in one document. For a list of links for different versions of jQuery libararies, go to https://code.jquery.com/.
You can embed your JavaScript or jQuery code into your html file by placing it between an opening and closing script tag near the bottom of your html file before the closing html tag. Embedded jQuery code should be placed after your link to the jQuery libary for it to work. These are the script tags to place embedded code between in an html document:
<script> </script>Instead of placing JavaScript or jQuery code embedded directly into your html file, you could also put all of it into an external .js file just for your script code and place a link in your html document to load the code in your .js file. links to external .js files should go near the end of you html code. I generally place them after the closing body tag, but before the closing html tag. This is how to place a link in an html document to a .js file:
<script src="yourExternalJsFile.js"> </script>This is what the structure of the bottom of your html document/web page code should look like:
</body> <script src="https://code.jquery.com/jquery-2.2.4.min.js"></script> <script>// Your jQuery Code is located here (embedded into the html document). // Double backslashes can be used to comment out a single line of text within JavaScript code /* is the sequence of characters used to start and end commented out lines of code in JavaScript similar to <!-- html comment --> tags in html. Several lines of text can be commented out using this method and this is the closing character sequence that can end several lines of commented out Javascript code: /*</script> </html>
OR this:
</body>
<script src="https://code.jquery.com/jquery-2.2.4.min.js"></script>
<script src="YourExternaljQueryCodeFile.js"></script>
// (Linked JavaScript or jQuery code located in an external file.)
</html>
Step 2: HTML for the Quiz
To create a quiz questionaire and place to display the results of answers to the quiz, you will need to create the necessary HTML to display it. Here an example of code used to create a dinosaur identification question and display the results of the user's answers:
<!-- The title of the Quiz displayed in header 3 <h3></h3> tags -->
<h3>Dinosaur Identification Challenge 2</h3>
<!-- (This code can be replaced with a different image link to customize to display a different dinosaur.) -->
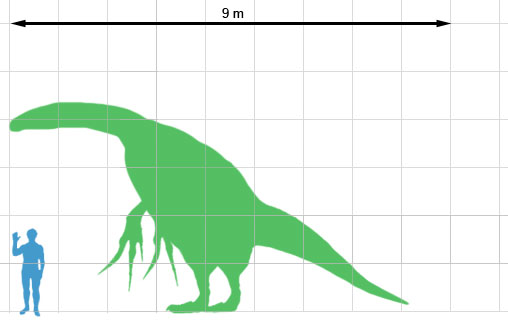
<img alt="Hint: The scientific name means of this dinosaur means scythe lizard." src="images/Unlabeled_scale.jpg">
<!-- HTML from creativecommons.org to credit the Creative Commons source:-->
<p style="font-size: 0.9rem;font-style: italic;">
<span>Dinosaur Image Original: Jaime Headden Derivative work: Matt Martyniuk</span></span> is licensed under
<a href="https://creativecommons.org/licenses/by-sa/4.0?ref=ccsearch&atype=html" style="margin-right: 5px;">CC BY-SA 4.0</a>
<a href="https://creativecommons.org/licenses/by-sa/4.0?ref=ccsearch&atype=html" target="_blank" rel="noopener noreferrer"
style="display: inline-block;white-space: none;margin-top: 2px;margin-left: 3px;height: 22px !important;">><img style="height: inherit;
margin-right: 3px;display: inline-block;" src="https://search.creativecommons.org/static/img/cc_icon.svg?image_id=aa70fc82-e119-4f08-acd2-cf942079a992" />
<img style="height: inherit;margin-right: 3px;display: inline-block;" src="https://search.creativecommons.org/static/img/cc-by_icon.svg" />
<img style="height: inherit;margin-right: 3px;display: inline-block;" src="https://search.creativecommons.org/static/img/cc-sa_icon.svg" /></a></p>
<!-- Question for the user in paragraph <p></p> tags -->
<p>Which Species of Dinosaur is displayed in the image above?</p>
<!-- Form displays answer option available for the quiz as buttons -->
<form action="">
<input type="button" class="quizButton" id="A" value="A. Plateousaurus"><br>
<input type="button" class="quizButton" id="B" value="B. Iguanodon"><br>
<input type="button" class="quizButton" id="C" value="C. Big Bird"><br>
<input type="button" class="quizButton" id="D" value="D. Therizinosaurus"><br>
</form>
<!-- Displays a response based on the answer button the user clicked -->
<p><span id="answerA" class="wrongAnswer">Wrong Answer! It's not a plateosaurus!</span>
<span id="answerB" class="wrongAnswer">Wrong Answer! It's not an iguanodon!</span>
<span id="answerC" class="wrongAnswer">Wrong Answer! It's not Big Bird!</span>
<span id="answerD" class="correctAnswer">Correct Answer! It's a Therizinosaurus!</span></p>
You can change the question, image, and the answers used in my example to anything you want if you create your own version of this questionaire for your own web page and still use the same basic format if you want.
HTML Basics: How to Customize the Content of Your HTML Code
For example, you could change the URL in the <img src="URL"> to a URL for a different image to display a different image in a page. If you wanted to use a different image instead of the dinosaur in this example, this is the code where you would need to change the URL used in the src attribute of the image:
<!-- (This code can be replaced with a different image link to customize to display a different dinosaur.) -->
  <img alt="Hint: The scientific name means of this dinosaur means scythe lizard." src="images/Unlabeled_scale.jpg">
The alt attribute should be included in an image to provide a description of the image. The description will be shown if the image does not load properly. It also improves usability for people with disabilities who use software that relies on alt tags to describe content to the user.
You could also change the text displayed on the button for the answer options by changing the value attribute text on the buttons. For example:
<!-- Form displays answer option available for the quiz as buttons -->
<form action="">
<input type="button" class="quizButton" id="A" value="1. This value for button A was “A. Plateousaurus”"><br/>
<input type="button" class="quizButton" id="B" value="2. Now the text for button B is also changed!"><br/>
<input type="button" class="quizButton" id="C" value="C. See it is changed!"><br/>
<input type="button" class="quizButton" id="D" value="D. Look! I can make it anything I want to!"><br/>
</form>
This is what the buttons will look like with those changes applied to the HTML:
HTML Basics: HTML Tags, Attributes & Terms
Alt Attribute
The alt attribute adds a description to an element, like an image <img> tag, for example. The description is not normally visible on the page, but will be shown if the image doesn't load properly.
It also improves usability for people with disabilities who use software that relies on alt tags to describe content to the user.
<H1> <H2> <H3> <H4> <H5> <H6> Header Tags
Header Tags are used to display heading. By default, they are displayed larger than regular text and rank as more highly relevant to describing content of a page to search engines.
H1 is displayed the biggest by default and most prioritized as relevant page content by search engines. H6 is displayed by default as the smallest header tag and still read by search engines as relevant
to page content. Other header tags (2-5) in between range by size and heirarchy priority based on the number following h in the tag. H1 is the most important heading and H6 is the least important heading.
<p> Paragraph tags
Paragraph tags are used to display text in paragraphs.
By default, they have spacing above the beginning of the paragraph and below the end of the paragraph.
CSS (Cascading Style Sheets)
All default display settings can be altered and customized using CSS. This tutorial doesn't go much into CSS, but it's definitley helpful for styling web pages. I recommend learning it if you're seriuos about building web pages.
<span></span> Span Tags
Span tags are inline elements that were used in this code example to display the answer responses within a paragraph tag in this code example.
Class & Id
Class and Id attributes were applied to several elements (span tags and buttons in this example, but elements can refer to almost everything in an html document).
Class and id tags can be given customized names and used by CSS and JavaScript to reference elements and apply styles or interactive features to them.
Class Names
You can make the name of a class anything you want and apply it to multiple elements on an html page. This is an example of how a name is applied to a class:
<p class="className"></p>Id Names
Id names have to be unique for each id and can only be used once by only one element in an html page. You can have multiple elements with Ids on a page, but each Id must use a unique name. This is an example of how a name is applied to a class:
<p id="uniqueIdName"></p>Step 3: jQuery to Make the Quiz Work
This is the jQuery that makes the quiz display feedback based on the answer inputs of the user:
// Link to the jQuery Library
<script src="https://code.jquery.com/jquery-2.2.4.min.js"
integrity="sha256-BbhdlvQf/xTY9gja0Dq3HiwQF8LaCRTXxZKRutelT44="crossorigin="anonymous">
</script>

<script>
// jQuery code to make the quiz work

// Makes the answer click responses hidden until they are clicked
$(".wrongAnswer").hide();
$(".correctAnswer").hide();

// Applies hexadecimal code to change the background color:
// Orange background for wrong answers:
$(".wrongAnswer").css("backgroundColor", "#e87a1a");
// Green background for the correct answer:
$("#answerD").css("backgroundColor", "#92db2e");

// Shows the response for clicking answer A and hides others
$("#A").click(function(){
  $("#answerA").show();
  $("#answerB").hide();
  $("#answerC").hide();
  $(".correctAnswer").hide();
});

// Shows the response for clicking answer B and hides others
$("#B").click(function(){
  $("#answerA").hide();
  $("#answerB").show();
  $("#answerC").hide();
  $(".correctAnswer").hide();
});

// Shows the response for clicking answer C and hides others
$("#C").click(function(){
  $("#answerA").hide();
  $("#answerB").hide();
  $("#answerC").show();
  $(".correctAnswer").hide();
});

// Shows the response for clicking answer D and hides others
$("#D").click(function(){
  $(".wrongAnswer").hide();
  $(".correctAnswer").show();
});

</script>
What Does This jQuery Code Do?
Referencing an Element With a Class
$(.className) is how jQuery references an element with a class.
Referencing an Element With an ID
$(#idName) is how jQuery references an element with using the name of an id.
Hiding an Element with jQuery
$(".wrongAnswer").hide(); makes all the elements with the class name of "wrongAnswer" hidden so it is not visible on the page.
$("#answerA").hide(); would hide just one element with the id name of "answerA".
Showing a Hidden an Element with jQuery
$(".correctAnswer").show(); makes all the elements with the class name of "correctAnswer" visible so it will be shown on the page.
Applying an Effect with a Click:
This code would create a function that is activated by a click event for the element referenced with an id:
$("#idName").click(function(){
  // code referencing elements and applying effects to them
});
For example, this is the code in this quiz for what happens if the user clicks the button for answer A. It makes the corresponding answer response text for answer A display in the paragraph tag below the answer buttons and hides all of the other ones.
// Shows the response for clicking answer A and hides others
$("#A").click(function(){
  $("#answerA").show();
  $("#answerB").hide();
  $("#answerC").hide();
  $(".correctAnswer").hide();
});
Applying the Background Color Changes by Applying a CSS Attribute with jQuery
This is how the background color changes were added to the answer response text that is displayed based on which answer the user clicks.
When taking the quiz, if the user clicks a wrong answer, the background color for the answer response text that is displayed will be orange. If the user clicks the correct answer, the background color for the answer response text that is displayed will be green. This effect was achieved by using jQuery to reference a class or id for the corresponding answer text response and then applying a CSS change to the background color CSS attribute of multiple elements referenced by jQuery with their class name or a single element referenced by jQuery with its id name.
The # symbol goes before the name of an id to call a reference to an id
The . dot goes before the name of a class to call a reference to all the elements with a class name
There are multiple wrong answers. There is a <span></span> tag for each wrong answer containing the response text for the corresponding answer button clicked. All of the <span></span> tags for each wrong answer have the same class applied to them for the wrong answer. By referencing the class for all of the span tags for every wrong answer, all of the spans for all of the wrong answer responses can be targetted at the same time with just one CSS reference to their class name. The class name ".wrongAnser" was called by jQuerry and then a css background color change to orange was applied to that class name. This is the hexadecimal code for the shade of orange that is used: "#e87a1a".
There is only one right answer. There is a <span></span> tag containing the response text to be displayed when the user clicks the button for the right answer. There is only one response text for the one right answer and it has the id name of "asnwerD". The name of the id for the span tags containing the response text is answerD. The hexidecimal color code for the shade of green used for its background is #92db2e. In the code below, jQuery calls a reference to the span for the correct answer response text by calling a reference to its id name with "#answerD". Then it applies a css change to the "backgroundColor" css attribute to apply the green background color with the hexidecimal code, "#92db2e".
// Applies hexadecimal code to change the background color:
// Orange background for wrong answers:
$(".wrongAnswer").css("backgroundColor", "#e87a1a");
// Green background for the correct answer:
$("#answerD").css("backgroundColor", "#92db2e");
Now you know how to apply a CSS style using jQuery!
Comment on Best Practices
There are some times when making a CSS change with JavaScript or jQuery is actually very useful or necessary, but it wasn't absolutely required for this quiz other than for demonstration purposes. jQuery actually isn't needed at all to apply the background color to those spans. It was just used that way in this tutorial example for the purpose of demonstrating how jQuery can be used to change css. The only thing in this quiz that actually needs JavaScript or jQuery is hiding and showing answer response text depending on which answer button the user clicks.
It's actually much simpler and better practice to just use regular css to apply style changes for things like this that don't actually need JavaScript functions to change their appearance. The background colors for those spans never really change, so JavaScript and jQuery are not necessary for this feature and the same effect can be achieved with regular CSS. It's better to use regular CSS if JavaScript is not needed to apply CSS styles because it is a lot faster and more efficient to load the style changes and there is less chance of browser compatibility issues being an issue.
It's generally better to only use JavaScript or jQuery apply a css style if it needs to change based on something the user does. In the coding example for this quiz, the spans and the text inside them actually never change. Only the visibility of them changes using jQuery.
Applying a Custom Style Change with CSS
There are actually several ways you could apply a style change to an element with CSS. The best method can vary depending on the context of your need. Here are several ways to change the color of an element with CSS that are technically better for most situations, particularly when the element's color does not need to change with JavaScript. By the way, CSS stands for "Cascading Style Sheets".
Inline CSS
Inline CSS can be used to apply a style change to an element within the < > tags of the element itself using style="". Inline CSS will only allow you to make a change to one element at a time, not much different than applying a change to one element with html. If you need to change it, you would have to make that change to each html element individually.
<!-- Displays a response based on the answer button the user clicked -->
  <p><span id="answerA" class="wrongAnswer" style="background-color: #e87a1a;">Wrong Answer! It's not a plateosaurus!</span>
  <span id="answerB" class="wrongAnswer" style="background-color: #e87a1a;">Wrong Answer! It's not an iguanodon!</span>
  <span id="answerC" class="wrongAnswer" style="background-color: #e87a1a;">Wrong Answer! It's not Big Bird!</span>
  <span id="answerD" class="correctAnswer" style="background-color:#92db2e;">Correct Answer! It's a Therizinosaurus!</span></p>
Internal CSS
Internal CSS is embedded into the <head> </head> section near the top of the html page. It allows you to apply styles to target the id of an element or a class. Applying a style change to a class allows you to apply a style change to several elements on a page all a once much faster and more efficiently than making changes to each element individually. For example, the code below targets the wrongAnswer and correctAnswer classes and applies a color to each class. Every element with the wrongAnswer class would receive the background color change to the color #e87a1a; without having to make the change to each element individually. If you changed the background-color property of the wrongAnswer class again, the change would automatically be applied to every element with that class by changing just one line of code in the css styles instead of having to change it for each element individually. To create or reference a css class, use a . (dot) before the name of the class in the css code, followed by { Your style property: change; } brackets containing the style changes you want to apply. Don't forget the ; semicolon at the end of each style change you declare.
<!doctype html>
<html lang="en"> <!-- Sets the language of the page to English. Other language codes can be used if needed. -->
<head>
<meta charset="UTF-8"> <!-- Specifies the character encoding of the html document. -->
<title>Your Web Page Title</title>
<!--The page title will be displayed in the browser tab and also effects SEO (Search Engine Optimization).-->
<link rel="stylesheet" type="text/css" href="index.css">
<!-- This line above here ^ is a link to an external css page used to apply css styles to your html page -->
<!-- This  section below is an example of Internal CSS applied to the page containing it -->
<style>
  .wrongAnswer {
    background-color: #e87a1a;
  }

  .correctAnswer {
    background-color:#92db2e;
  }
</style>
</head>
External CSS
Internal CSS styles can apply styles to multiple elements on one page all at once, but external stylesheets can go a step further and be used to apply CSS styles to multiple elements at once, on multiple pages all at once! To create an external style sheet, you would create a separate document with the following code in a .css page. Then you have created a CSS style sheet page.
.wrongAnswer {
  background-color: #e87a1a;
}

.correctAnswer {
  background-color:#92db2e;
}
When you have a .css page, there is one more step you would need to do to get the styles in the .css page to apply to your html pages. Every html page that you want to receive the styles in your .css page would need this link in the <head> </head> section near the top of the page in order to access the CSS styles on your .css style sheet page. This is how to create a link on an html page to an external style sheet:
<!doctype html>
  <html lang="en"> <!-- Sets the language of the page to English. Other language codes can be used if needed. -->
  <head>
  <meta charset="UTF-8">
  <title>Your Web Page Title</title>
  <!--The page title will be displayed in the browser tab and also effects SEO (Search Engine Optimization).-->
  <link rel="stylesheet" type="text/css" href="NameOfYourStyleSheet.css">
  <!-- This line above here ^ is a link to an external css page used to apply css styles to your html page -->
  </head>
End Result Example:
Dinosaur Identification Challenge 2
Dinosaur Image Original: Jaime Headden Derivative work: Matt Martyniuk
is licensed under CC BY-SA 4.0Which Species of Dinosaur is displayed in the image above?
Wrong Answer! It's not a plateosaurus! Wrong Answer! It's not an iguanodon! Wrong Answer! It's not Big Bird! Correct Answer! It's a Therizinosaurus!